There are few candies as nostalgic and delightful as classic Homemade Butter Mints. These aren’t just sweets; they’re tiny, melt-in-your-mouth pillows of creamy, minty bliss. Just looking at a bowl filled with their soft pastel colors—baby pink, pale yellow, mint green, and pure white—is enough to bring a smile to your face. The powdery, matte texture promises a softness that dissolves on the tongue, a perfect blend of rich butter and cool peppermint.
This recipe captures that exact magic. We’re going beyond just a simple candy and creating an experience—the kind you’d find at a charming old-fashioned confectionery. Get ready to make the softest, most beautiful pillow-shaped butter mints you’ve ever tasted, perfect for holidays, weddings, or simply as a sweet afternoon treat.
Why You’ll Fall in Love With This Butter Mints Recipe
- Unbelievably Soft Texture: Forget hard, chalky mints. These have a rich, buttery base that makes them genuinely melt in your mouth, enhanced by a delicate, powdery sugar coating.
- Visually Stunning Results: Achieve those beautiful, soft pastel hues seen in high-end candy shops. We’ll show you how to get the perfect baby pink, pale yellow, and mint green shades.
- Surprisingly Simple to Make: With just a handful of ingredients and no complex baking, this is a straightforward recipe perfect for even novice candy makers.
- Completely Customizable: While perfect for any occasion, these mints are a popular choice for weddings and baby showers. You can easily tint them to match any party theme.
 2")
The Core Components for Creamy, Dreamy Mints
Every ingredient plays a critical role in achieving the perfect texture and flavor. Here’s what you’ll need and why:
Unsalted Butter
This is the heart of the recipe, providing the rich flavor and melt-away texture. Use 1/2 cup (113g) of high-quality, unsalted butter, brought to room temperature so it can be whipped into a light and fluffy base.
Powdered Sugar
Also known as confectioners’ sugar, this is the primary structural ingredient. It dissolves completely, ensuring a smooth, grit-free candy. You’ll need 4 cups (480g), plus a little extra for dusting.
Heavy Cream
Just 2 tablespoons (30ml) of heavy cream brings the dough together, adding moisture and extra richness. In a pinch, you can use whole milk, but heavy cream provides the best flavor and texture.
Peppermint & Vanilla Extract
A combination of 1 teaspoon (5ml) of peppermint extract and 1/2 teaspoon (2.5ml) of vanilla extract creates the perfect flavor profile. The peppermint is the star, while the vanilla enhances the buttery notes.
A Pinch of Salt
Never underestimate the power of 1/4 teaspoon of salt! It balances the intense sweetness and makes the butter and mint flavors pop.
Pastel Gel Food Coloring
To achieve those delicate pastel colors, gel food coloring is essential. You only need a tiny drop each of pink, yellow, and green. Liquid coloring can add too much moisture and make the dough sticky.
Essential Tools for Perfect Pillow Mints
You don’t need professional candy-making equipment for this recipe, just a few kitchen basics:
- Stand Mixer or Hand Mixer: This is crucial for creaming the butter and sugar together properly to create a light, airy base.
- Parchment Paper: You’ll need this to roll out the candy ropes and for the drying process to prevent sticking.
- Bench Scraper or Sharp Knife: A bench scraper is the ideal tool for cutting clean, uniform pillow shapes.
- Small Bowls: For dividing and coloring the dough.
 3")
Crafting Your Homemade Butter Mints, Step-by-Step
Follow these instructions closely to achieve that signature soft, powdery texture. We’ve broken it down into simple phases for perfect results every time.
Step 1: Create the Buttery Base Dough
In the bowl of a stand mixer fitted with the paddle attachment, or in a large bowl with a hand mixer, beat the softened unsalted butter on medium speed until it’s completely smooth and creamy. You’re looking for a light, pale consistency. This step whips air into the butter, which is key to the mints’ light texture.
With the mixer on low, gradually add 2 cups (240g) of the powdered sugar, the heavy cream, both extracts, and the salt. Mix until everything is just combined, scraping down the sides of the bowl as needed. The mixture will be soft and sticky at this point.
Continue adding the remaining 2 cups (240g) of powdered sugar, about a half cup at a time, mixing on low until a stiff, but pliable, dough forms. It should pull away from the sides of the bowl and be easy to handle without being overly sticky.
Step 2: Infuse with Delicate Pastel Colors
Divide the dough into four equal portions. Leave one portion white. Place the other three portions into separate small bowls.
Add a tiny drop of pink gel food coloring to one bowl, a drop of yellow to another, and a drop of green to the third. Knead the color into each dough ball with your hands (you may want to wear gloves) until the color is uniform and pastel. Be careful not to over-mix.
Step 3: Rolling and Shaping the Pillow Mints
Lightly dust a clean work surface with powdered sugar. Take one portion of dough and roll it into a long, thin rope about 1/2-inch (1.25cm) in diameter. If the dough feels sticky, you can dust your hands with a little more powdered sugar.
Using a bench scraper or sharp knife, cut the rope into small 1/2-inch (1.25cm) pieces. This will give you the classic small, rectangular pillow shape. Place the cut mints in a single layer on a baking sheet lined with parchment paper, ensuring they aren’t touching.
Repeat the process with the remaining three colors of dough.
Step 4: The Crucial Drying and Curing Process
Let the mints sit uncovered at room temperature for at least 12 hours, or up to 24 hours. This allows them to form a slightly firm exterior shell while the inside remains perfectly soft and creamy. This step is essential for their signature texture.
Once dried, you can lightly toss them in a bit more powdered sugar for that classic powdery, matte coating. This also prevents them from sticking together in storage.
Expert Secrets for Flawless Butter Mints
- Don’t Rush the Drying: The drying or “curing” step is non-negotiable. It develops the perfect texture contrast between the soft interior and the slightly firmer exterior shell.
- If Dough is Too Sticky: Your kitchen’s humidity can affect the dough. If it feels too wet to roll, add a bit more powdered sugar, one tablespoon at a time, until it’s pliable.
- Gel Colors are Key: Avoid liquid food coloring. Gel-based colors are highly concentrated and won’t add excess moisture that could ruin the dough’s consistency.
- Uniformity is Your Friend: Try to roll your ropes to a consistent diameter and cut the pieces to a uniform size. This ensures they all dry evenly and look professional.
Storing Your Homemade Candy Creations
To keep your homemade butter mints fresh, store them in an airtight container at room temperature. Place a piece of parchment paper or wax paper between layers to prevent sticking. They will stay fresh and delicious for up to two weeks.
We do not recommend freezing the mints, as the thawing process can cause them to become sticky and lose their delicate powdery coating.
Perfect Pairings and Serving Ideas
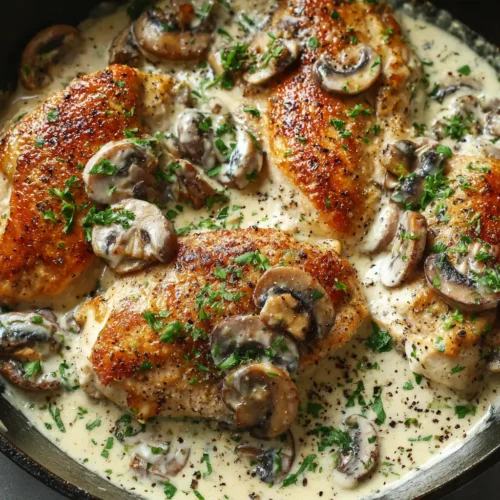
These mints are the perfect ending to a rich and savory meal. They act as a wonderful palate cleanser after a hearty dinner. Imagine serving them after a comforting bowl of Crock-Pot Potato Soup (coming soon) on a cold day, or as a sweet counterpoint to the bold flavors in our Creamy Boursin Chicken. They are also an elegant addition to a dessert table alongside other no-bake treats like our famous No-Bake Christmas Oreo Lasagna.
Frequently Asked Questions About Homemade Butter Mints
Have questions? We have answers to help you make the perfect batch.
Absolutely! While peppermint is classic, you can easily substitute it with other extracts like almond, lemon, or orange for a different flavor profile. Just use the same amount called for in the recipe.
Yes, this step is crucial! Letting the mints air-dry for 12-24 hours allows them to develop a slightly firm outer shell, which gives them their signature texture while keeping the inside soft and creamy. Skipping this step will result in very soft, sticky mints.
When stored properly in an airtight container at room temperature, homemade butter mints will stay fresh for up to two weeks. Be sure to separate layers with parchment paper.
The primary difference is the fat used. Butter mints use butter for a rich, creamy flavor that melts smoothly. Cream cheese mints use cream cheese, which gives them a slightly tangy flavor and a denser, fudgier texture.
This is usually due to high humidity or a slight mis-measurement of liquids. Simply add more powdered sugar, one tablespoon at a time, and knead it in until the dough is firm and no longer sticky to the touch.
Your Complete Recipe for Old-Fashioned Butter Mints
Here is the full, printable recipe card with exact measurements and instructions. Get ready to create these beautiful, melt-in-your-mouth treats!
Homemade Butter Mints (The Ultimate Melt-in-Your-Mouth Recipe)
Ingredients
Equipment
Method
- In a stand mixer with a paddle attachment, beat the softened butter until creamy. On low speed, gradually add 2 cups of powdered sugar, heavy cream, peppermint extract, vanilla extract, and salt. Mix until combined. Add the remaining 2 cups of powdered sugar, mixing until a stiff, pliable dough forms.
- Divide the dough into four equal portions. Leave one white, and place the other three in separate bowls. Add a tiny drop of gel food coloring to each bowl (pink, yellow, green) and knead until the color is uniform.
- On a surface lightly dusted with powdered sugar, roll one portion of dough into a 1/2-inch (1.25cm) thick rope. Cut the rope into 1/2-inch (1.25cm) pieces to create pillow shapes. Place the mints in a single layer on a parchment-lined baking sheet.
- Let the mints sit uncovered at room temperature for 12-24 hours to dry. This allows them to form a firm outer shell while the inside stays soft. Once dry, toss lightly in additional powdered sugar if desired.
Notes
If Dough is Too Sticky: Add more powdered sugar, one tablespoon at a time, until it's pliable and easy to handle.
Gel Colors are Key: Avoid liquid food coloring to maintain the perfect dough consistency.
Uniformity is Your Friend: Try to cut pieces to a uniform size for even drying and a professional look.
Share Your Sweet Success!
We can’t wait to see your beautiful creations! If you make these Homemade Butter Mints, be sure to leave a comment below and let us know how they turned out. Don’t forget to save this recipe to your favorite board on Pinterest!
 5")