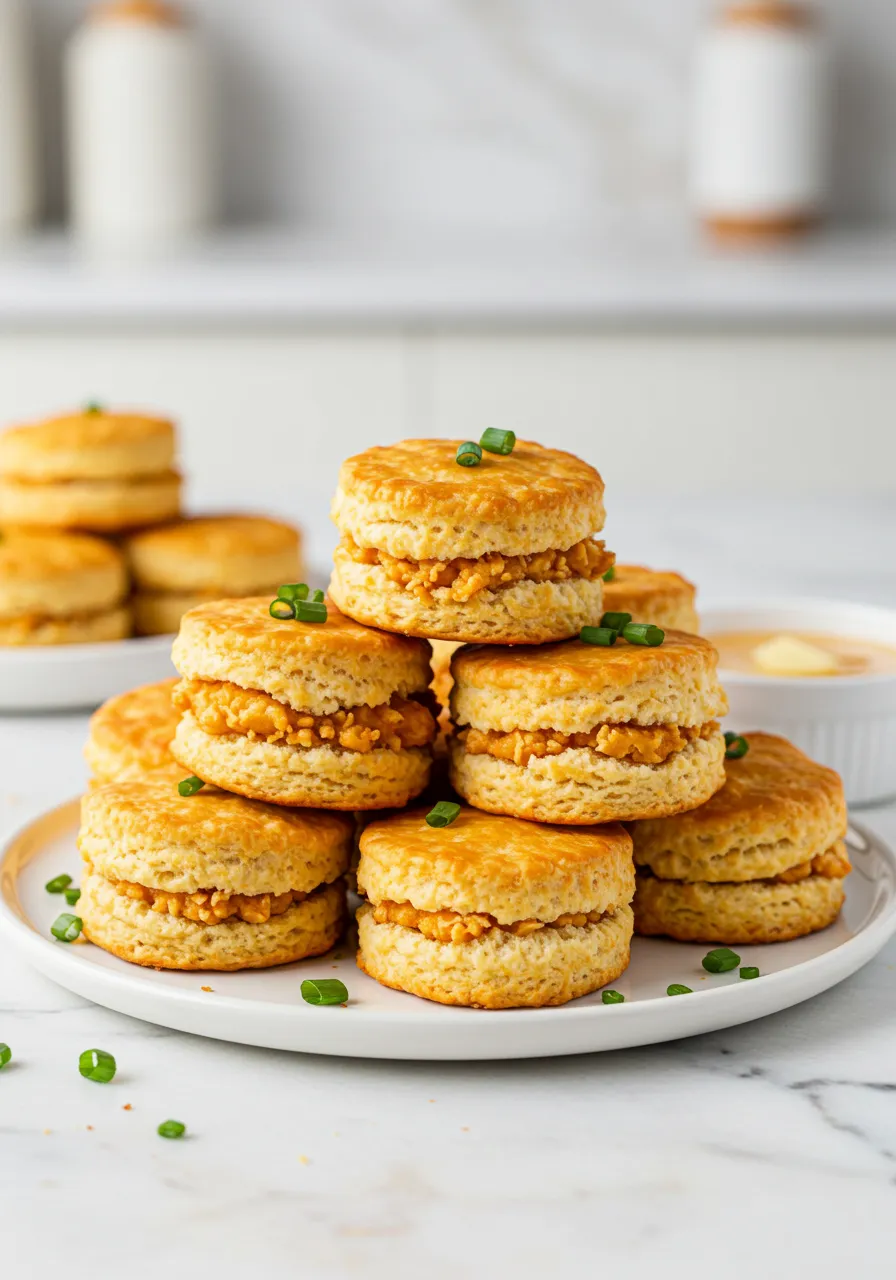
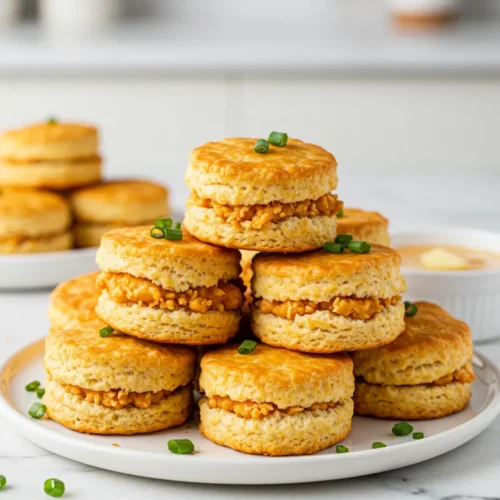
Oh, chicken minis! Just saying the words brings a smile to my face and instantly makes me think of cozy weekend mornings or a quick, satisfying snack on the go. There’s something undeniably comforting about the combination of warm, slightly sweet biscuit and crispy, savory chicken. For the longest time, I thought these little bundles of joy were strictly something you could only grab from a drive-thru. But let me tell you, making your own chicken minis recipe at home is not just possible; it’s surprisingly simple, incredibly rewarding, and frankly, tastes even better because you made them with love!
In This Post
Why You’ll Love This Chicken Minis Recipe
Why bother making chicken minis at home when you can just buy them? Well, besides the sheer joy of homemade goodness, here are a few compelling reasons why this recipe will become your new favorite:
- Surprisingly Easy: Forget complicated techniques. This recipe uses simple ingredients and straightforward steps that anyone can follow.
- Faster Than the Drive-Thru: Seriously! Especially if you use a shortcut like pre-cooked chicken pieces, you can have warm chicken minis ready in less time than it takes to get through the line on a busy morning.
- Customizable: Want spicier chicken? Different glaze? You’re the boss! Tailor these to your exact preferences.
- Kid-Approved: These are universally loved by little ones. Perfect for a special breakfast, lunchboxes, or an after-school snack.
- Budget-Friendly: Making a big batch at home is significantly cheaper than buying individual servings.
- Perfect for Any Time: While they’re famous for breakfast, chicken minis are fantastic for brunch, a party appetizer, or just whenever the craving strikes.
- Ultimate Comfort Food: Warm, soft, crispy, sweet, and savory – it hits all the right notes!
Chicken Minis Ingredients
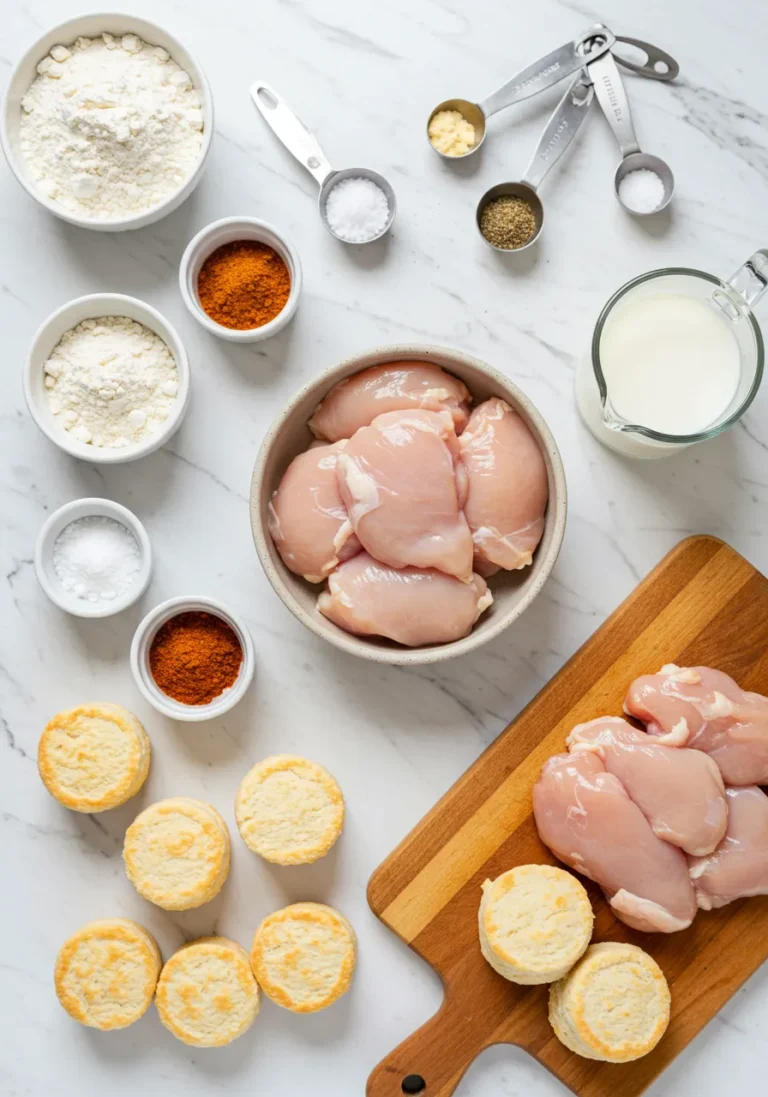
What You’ll Need
Gathering your ingredients is the first step to deliciousness. Here’s what we’ll need to create these delightful chicken minis. I’ve included options for making the chicken from scratch or using a simple shortcut!
- For the Chicken:
- 1 pound Boneless, skinless chicken breasts or thighs (cut into 1-inch pieces) OR 1 pound Frozen popcorn chicken or chicken nuggets
- 1 cup Buttermilk (or milk with 1 tbsp lemon juice/vinegar)
- 1 cup All-purpose flour
- 2 tsp Smoked paprika (for warmth and color)
- 1 tsp Garlic powder
- 1 tsp Onion powder
- 1 tsp Salt (fine sea salt is great here)
- 1/2 tsp Black pepper
- Vegetable oil or canola oil, for frying (about 3-4 cups) OR cooking spray/light oil for baking/air frying
- For the Biscuits:
- 1 (16.3 oz) can Refrigerated biscuit dough (specifically the small, layered ones if possible, or cut larger biscuits into smaller portions) OR ingredients for your favorite small homemade biscuit recipe
- For the Glaze:
- 1/2 cup Unsalted butter, melted
- 2 tbsp Honey or maple syrup (adjust to your sweetness preference)
Smart Swaps & Flavor Boosts
Want to shake things up or adapt the recipe? Here are some ideas:
- Gluten-Free: Use your favorite gluten-free all-purpose flour blend for the chicken coating and a gluten-free biscuit mix or recipe.
- Dairy-Free: Use a plant-based milk alternative mixed with lemon juice/vinegar for the buttermilk soak, dairy-free butter, and ensure your biscuit dough is dairy-free.
- Healthier Option: Skip the frying and air fry or bake your homemade or store-bought chicken pieces. They’ll still get crispy! Use a whole wheat biscuit recipe if you’re making them from scratch.
- Bolder Flavor: Add a pinch of cayenne pepper to the flour mix for a little heat, or whisk a teaspoon of hot sauce into the butter-honey glaze.
- Upgrade Suggestion: For an extra layer of deliciousness, brown the butter for the glaze before melting it fully and stirring in the honey. This gives it a nutty, complex flavor.
Ingredient Notes & Sourcing
A few tips on selecting and preparing your ingredients:
- Chicken: If using chicken breasts, cutting them into uniform 1-inch pieces ensures even cooking. Thighs offer a bit more moisture and flavor. If using store-bought, choose a brand you trust for flavor and texture.
- Buttermilk: The acidity in buttermilk helps tenderize the chicken and helps the coating adhere. If you don’t have buttermilk, mix 1 cup of milk with 1 tablespoon of white vinegar or lemon juice and let it sit for 5-10 minutes until it curdles slightly.
- Biscuits: The small, “mini” layered biscuits from the refrigerated section are the most convenient and mimic the classic look. If you can’t find them, you can use regular size biscuits and cut them into quarters or smaller pieces before baking, just be mindful of the baking time. You can also use frozen biscuit dough rounds or even make a simple drop biscuit recipe.
- Oil for Frying: Choose an oil with a high smoke point, like vegetable, canola, or peanut oil. You need enough oil to submerge the chicken pieces, so using a smaller, deeper pot is more efficient than a wide skillet.
- Storing Ingredients: Keep chicken refrigerated or frozen until ready to use. Buttermilk and refrigerated biscuits belong in the fridge. Flour and spices should be stored in a cool, dry pantry.
Essential Equipment
You don’t need a professional kitchen setup to make these delicious chicken minis. Here’s a list of what will help you get the job done smoothly:
- Mixing Bowls: You’ll need at least two – one for the buttermilk soak (if making chicken from scratch) and one for the flour coating. A third for the glaze is helpful.
- Measuring Cups and Spoons: Precision matters in recipes, especially with seasonings and the glaze.
- Sharp Knife and Cutting Board: For cutting chicken (if using whole pieces) and potentially the biscuits.
- Baking Sheet: For baking the biscuits. Line it with parchment paper for easy cleanup.
- Wire Rack (Optional but Recommended): Placing the baked biscuits and cooked chicken on a wire rack allows air circulation, helping them stay crisp and preventing the bottoms from getting soggy. Place it over a baking sheet for drips.
- Dutch Oven or Heavy-Bottomed Pot (for frying): A sturdy pot maintains even heat, which is crucial for frying success. If you don’t have one, any pot deep enough to hold a few inches of oil safely will work, but you’ll need to monitor the oil temperature more closely.
- Thermometer (Candy/Oil or Instant-Read): Essential for maintaining the correct oil temperature if frying (around 350-375°F or 175-190°C). It ensures the chicken cooks through without burning the outside or becoming greasy from too-cool oil. No thermometer? You can test the oil with a pinch of flour – it should sizzle immediately. This is less precise but works in a pinch.
- Slotted Spoon or Spider Skimmer: For safely adding and removing chicken from hot oil.
- Small Saucepan or Microwave-Safe Bowl: For melting the butter for the glaze.
- Pastry Brush (Optional): For brushing the glaze onto the biscuits.
- Air Fryer (Alternative to Frying): If you prefer air frying, you’ll need an air fryer basket.
Crafting Your Chicken Minis: Step-by-Step

Alright, let’s turn these simple ingredients into those craveable chicken minis! We’ll prepare the components and then assemble these delightful bites. This process takes about 20 minutes of prep time (less if using pre-cooked chicken and canned biscuits) and 10-15 minutes of cook time.
- Prep the Chicken (Choose Your Method):
- If using chicken breasts/thighs: Cut the chicken into roughly 1-inch pieces. Place the chicken in a bowl and pour the buttermilk over it. Stir to coat, cover, and refrigerate for at least 30 minutes (or up to 4 hours) to tenderize. In a separate shallow dish, whisk together the flour, smoked paprika, garlic powder, onion powder, salt, and pepper.
- If using frozen popcorn chicken/nuggets: Follow the package directions for cooking, but aim for slightly less cook time than recommended initially, as they’ll be reheated during assembly. You can bake, air fry, or even lightly fry these according to package instructions.
- Prepare for Cooking Chicken (If making from scratch): If frying, pour about 3-4 inches of vegetable oil into your Dutch oven or heavy pot. Heat over medium-high heat until the oil reaches 350-375°F (175-190°C). If baking or air frying, preheat your oven or air fryer according to package directions (usually around 400°F or 200°C) and lightly grease the cooking surface.
- Coat the Chicken (If making from scratch): Remove chicken pieces from the buttermilk, letting excess drip off slightly. Dredge each piece thoroughly in the seasoned flour, pressing gently to coat. For extra crispiness, you can dip it back into the buttermilk briefly and then into the flour again for a double coat. Place coated chicken pieces on a wire rack while you finish coating.
- Cook the Chicken:
- To Fry: Carefully add coated chicken pieces to the hot oil in batches. Do not overcrowd the pot, as this lowers the oil temperature and results in greasy chicken. Fry for 4-6 minutes, flipping halfway through, until golden brown and cooked through (internal temperature of 165°F or 74°C). Remove with a slotted spoon and place on a wire rack set over a baking sheet to drain excess oil.
- To Bake: Arrange coated chicken pieces or frozen pieces in a single layer on your prepared baking sheet or in the air fryer basket. Bake or air fry for 10-15 minutes (or according to package for frozen), flipping halfway, until golden brown and cooked through.
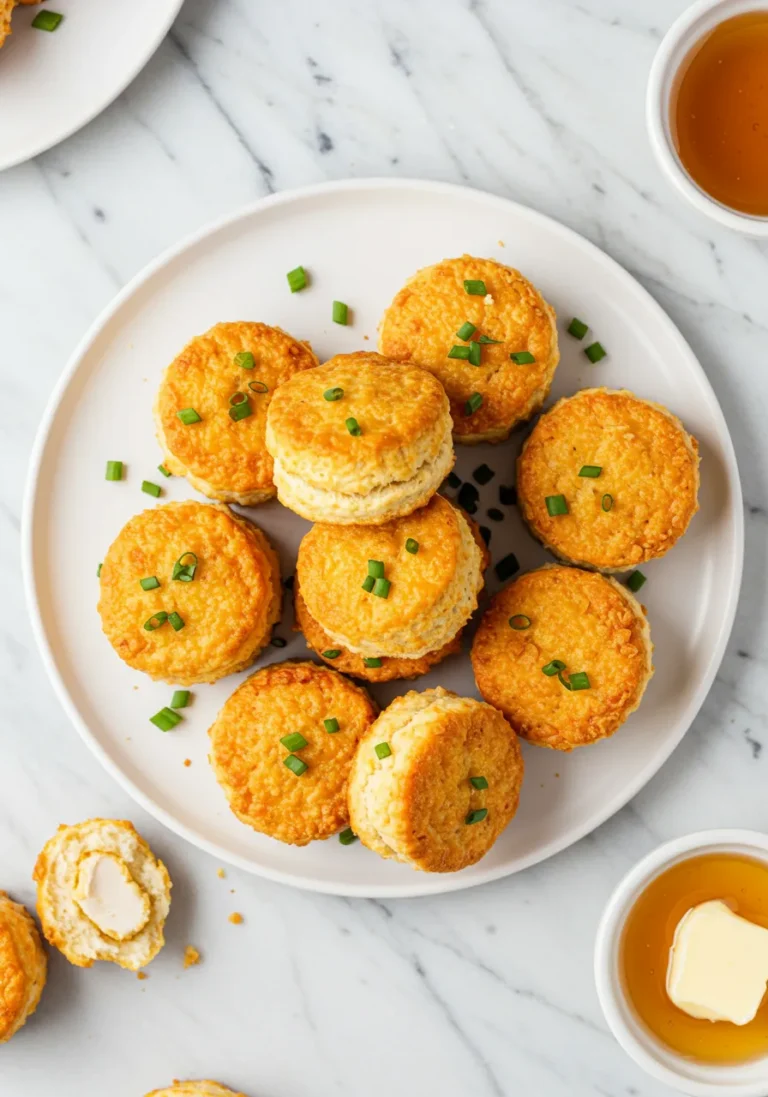
- Bake the Biscuits: While the chicken cooks (or immediately after), arrange the refrigerated biscuits on a baking sheet lined with parchment paper. If using larger biscuits, cut them into quarters or appropriately sized pieces. Bake according to package directions (usually 10-15 minutes at 350-375°F or 175-190°C), until puffed and golden brown. Let them cool slightly on a wire rack.
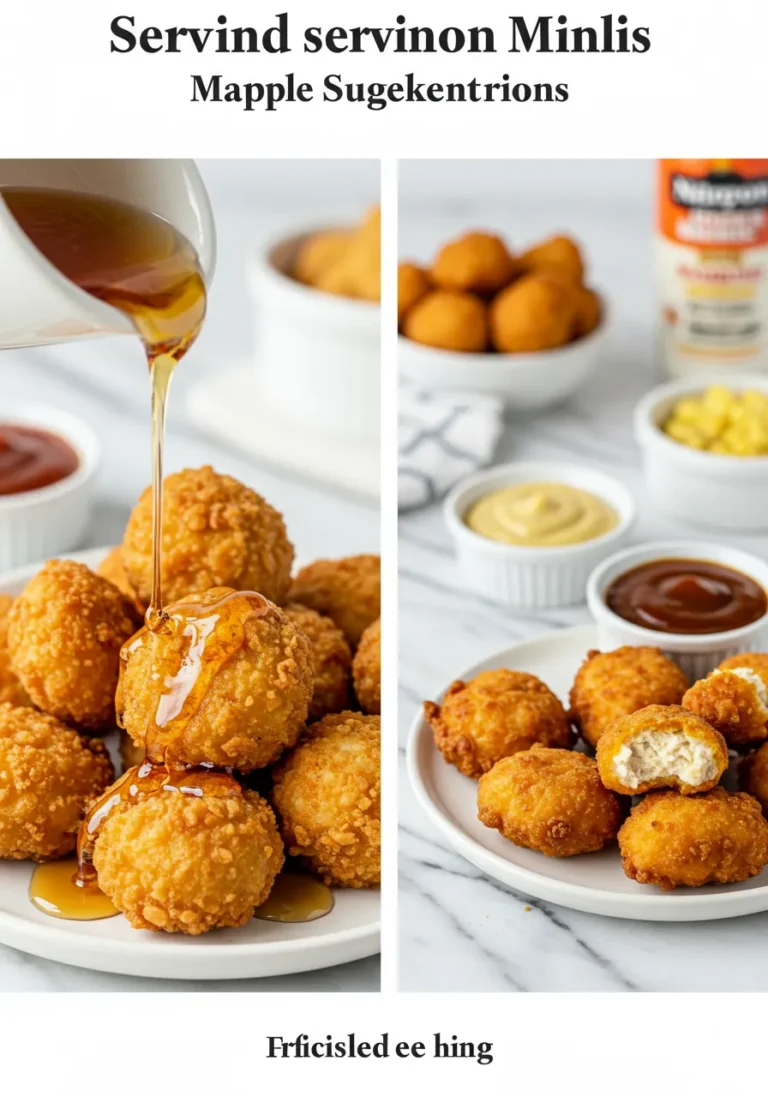
- Make the Glaze: While the biscuits are still warm, melt the butter in a small saucepan or microwave-safe bowl. Stir in the honey or maple syrup until well combined.
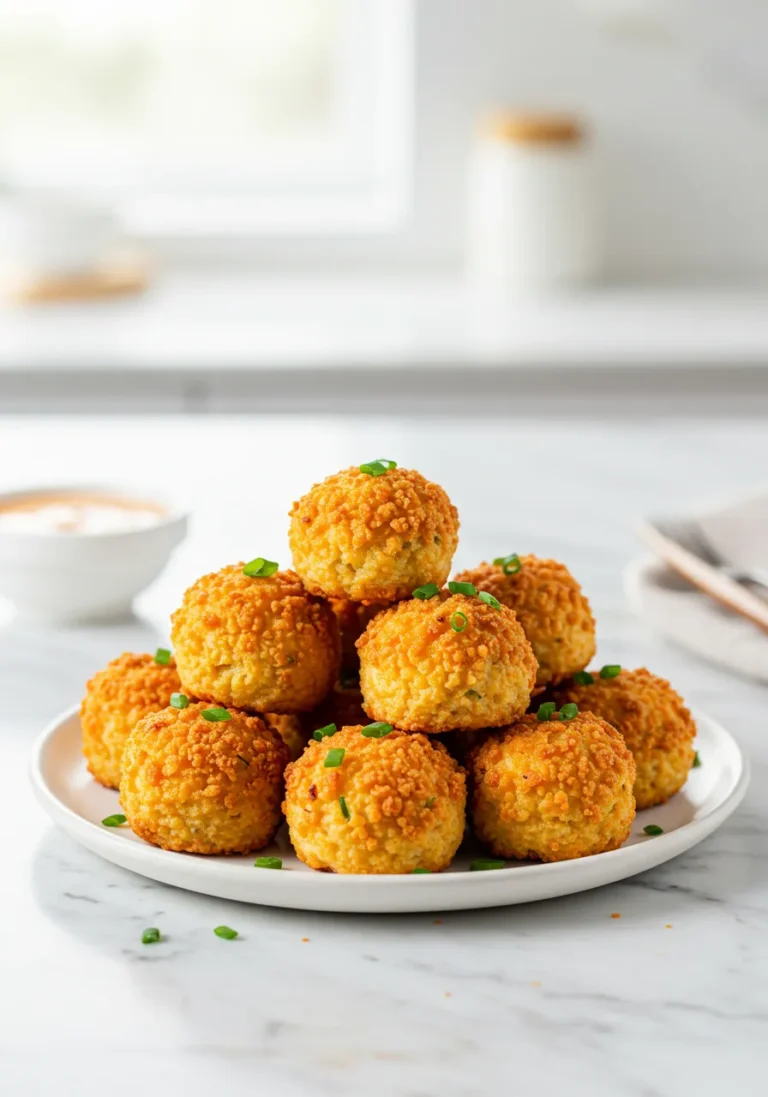
- Assemble the Minis: Carefully slice each biscuit in half horizontally. Place a cooked chicken piece on the bottom half of each biscuit. Drizzle or brush the warm honey-butter glaze over the chicken and the inside of the top biscuit half. Place the top half of the biscuit onto the chicken.
- Serve: Arrange the warm chicken minis on a platter and serve immediately.
Ensuring Perfection: Pro Tips & Troubleshooting
Making perfect chicken minis every time is easy with a few tricks up your sleeve. Here are some pro tips and how to fix common hiccups:
- The Secret to Crispy Fried Chicken (If Frying): Don’t skip the buttermilk soak! It adds flavor and helps the flour coating stick. Ensure your oil is at the correct temperature (350-375°F) and maintain it. Frying in batches is crucial to prevent the oil from cooling down too much.
- For Crispy Baked/Air Fried Chicken: Don’t overcrowd the baking sheet or air fryer basket. Give the pieces space so the air can circulate around them, which is key to getting a crispy exterior without oil. Flipping them halfway through also helps achieve even crisping.
- Biscuit Doneness: Biscuits should be golden brown on top and bottom and feel light. If they look pale, they might be doughy inside. Give them another minute or two. If the tops are browning too fast, you can tent them loosely with foil.
- Glaze Application: Apply the warm glaze right after the biscuits are sliced and the chicken is ready. The warmth helps the glaze melt slightly into the biscuit and chicken, creating that signature sweet-and-savory bond. A pastry brush gives the most even coating.
Common Pitfalls & How to Sidestep Them
- Soggy Chicken: Usually caused by oil that isn’t hot enough (if frying), overcrowding the pot/basket, or letting cooked chicken sit in a pile instead of on a wire rack. Solution: Monitor oil temp, cook in batches, use a wire rack.
- Hard/Dry Biscuits: Overbaking is the culprit. Solution: Stick to the package bake time and temperature, or your recipe’s guidelines, and check for doneness visually (golden brown) and by feel (light).
- Glaze Not Sticking: If the biscuits/chicken are cool, the glaze won’t absorb as well. Solution: Make and apply the glaze while everything is warm.
Technique Spotlight: Double Dredging for Extra Crisp
If you’re making the chicken from scratch and craving maximum crunch, try a double dredge. After the first dip in buttermilk and coating in seasoned flour, dip the chicken piece back into the buttermilk *very briefly* (just a quick dip) and then into the flour again. This builds up a thicker layer of coating, resulting in a noticeably crispier finish when fried or air fried.
Variations & Creative Twists
This recipe is a fantastic base for experimentation! Here are a few ways to put your own spin on these chicken minis:
- Spice It Up: Add a pinch of cayenne pepper or a dash of your favorite hot sauce to the chicken coating. You can also mix a little hot sauce or sriracha into the honey-butter glaze.
- Gourmet Twists:
- Herbed Butter: Infuse the melted butter for the glaze with fresh herbs like finely chopped rosemary or thyme before adding the honey.
- Garlic Parmesan: Mix grated Parmesan cheese and a little garlic powder into the flour coating for the chicken.
- Brown Butter Glaze: As mentioned in the ingredient swaps, browning the butter adds a depth of nutty flavor that’s absolutely divine.
- Simplify It: This recipe already uses simple components, but using pre-cooked, store-bought popcorn chicken or tenders cut into pieces is the ultimate shortcut for busy days. Using canned biscuits is also key to keeping it quick!
- Seasonal Swaps (for Serving): While the minis themselves aren’t seasonal, consider pairing them with seasonal fruit salads for a fresh breakfast or brunch option. In the summer, serve with fresh berries; in the fall, try sliced apples or pears.
Printable Recipe Card
Easy & Delicious Chicken Minis Recipe – Perfect for Breakfast & Snacking
Equipment
- 2 Mixing Bowls At least two needed
- Measuring Cups and Spoons
- Sharp Knife
- Cutting Board
- Baking Sheet
- Wire Rack Optional but recommended
- Dutch Oven or Heavy-Bottomed Pot For frying, or Air Fryer
- Thermometer Candy/Oil or Instant-Read, for frying
- Slotted Spoon or Spider Skimmer
- Small Saucepan or Microwave-Safe Bowl For the glaze
- Pastry Brush Optional, for glaze
Ingredients
- 1 pound Boneless, skinless chicken breasts or thighs cut into 1-inch pieces OR 1 pound Frozen popcorn chicken or chicken nuggets
- 1 cup Buttermilk or milk with 1 tbsp lemon juice/vinegar
- 1 cup All-purpose flour
- 2 tsp Smoked paprika for warmth and color
- 1 tsp Garlic powder
- 1 tsp Onion powder
- 1 tsp Salt fine sea salt is great here
- 1/2 tsp Black pepper
- 3-4 cups Vegetable oil or canola oil for frying (amount needed may vary) OR cooking spray/light oil for baking/air frying
- 1 Refrigerated biscuit dough (16.3 oz) can, specifically the small, layered ones if possible, or cut larger biscuits into smaller portions OR ingredients for your favorite small homemade biscuit recipe
- 1/2 cup Unsalted butter melted
- 2 tbsp Honey or maple syrup adjust to your sweetness preference
Instructions
- Prep the Chicken (Choose Your Method):
- If using chicken breasts/thighs: Cut the chicken into roughly 1-inch pieces. Place the chicken in a bowl and pour the buttermilk over it. Stir to coat, cover, and refrigerate for at least 30 minutes (or up to 4 hours) to tenderize. In a separate shallow dish, whisk together the flour, smoked paprika, garlic powder, onion powder, salt, and pepper.
- If using frozen popcorn chicken/nuggets: Follow the package directions for cooking, but aim for slightly less cook time than recommended initially, as they’ll be reheated during assembly. You can bake, air fry, or even lightly fry these according to package instructions.
- Prepare for Cooking Chicken (If making from scratch): If frying, pour about 3-4 inches of vegetable oil into your Dutch oven or heavy pot. Heat over medium-high heat until the oil reaches 350-375°F (175-190°C). If baking or air frying, preheat your oven or air fryer according to package directions (usually around 400°F or 200°C) and lightly grease the cooking surface.
- Coat the Chicken (If making from scratch): Remove chicken pieces from the buttermilk, letting excess drip off slightly. Dredge each piece thoroughly in the seasoned flour, pressing gently to coat. For extra crispiness, you can dip it back into the buttermilk briefly and then into the flour again for a double coat. Place coated chicken pieces on a wire rack while you finish coating.
- Cook the Chicken:
- To Fry: Carefully add coated chicken pieces to the hot oil in batches. Do not overcrowd the pot, as this lowers the oil temperature and results in greasy chicken. Fry for 4-6 minutes, flipping halfway through, until golden brown and cooked through (internal temperature of 165°F or 74°C). Remove with a slotted spoon and place on a wire rack set over a baking sheet to drain excess oil.
- To Bake: Arrange coated chicken pieces or frozen pieces in a single layer on your prepared baking sheet or in the air fryer basket. Bake or air fry for 10-15 minutes (or according to package for frozen), flipping halfway, until golden brown and cooked through.
- Bake the Biscuits: While the chicken cooks (or immediately after), arrange the refrigerated biscuits on a baking sheet lined with parchment paper. If using larger biscuits, cut them into quarters or appropriately sized pieces. Bake according to package directions (usually 10-15 minutes at 350-375°F or 175-190°C), until puffed and golden brown. Let them cool slightly on a wire rack.
- Make the Glaze: While the biscuits are still warm, melt the butter in a small saucepan or microwave-safe bowl. Stir in the honey or maple syrup until well combined.
- Assemble the Minis: Carefully slice each biscuit in half horizontally. Place a cooked chicken piece on the bottom half of each biscuit. Drizzle or brush the warm honey-butter glaze over the chicken and the inside of the top biscuit half. Place the top half of the biscuit onto the chicken.
- Serve: Arrange the warm chicken minis on a platter and serve immediately.
Notes
Serving & Pairing Suggestions
Chicken minis are incredibly versatile! Here are some ideas for how to serve and pair them:
- Classic Breakfast/Brunch: Serve alongside scrambled eggs, crispy bacon, a fruit salad, or breakfast potatoes. Don’t forget the coffee or orange juice!
- Party Appetizer: Arrange on a platter for guests. They’re perfectly portioned for popping! Add toothpicks if needed.
- Snack Attack: Grab a few whenever hunger strikes! Pair with a glass of milk or iced tea.
- Sweet & Savory Pairing: The honey-butter glaze provides that perfect balance. For an extra touch, have a small bowl of extra glaze or maple syrup available for dipping.
- Fresh Contrast: A simple side salad with a light vinaigrette can offer a nice, fresh contrast to the richness of the chicken and biscuit.
Plating Tip: For a simple but appealing presentation, arrange the chicken minis neatly on a platter. You can garnish the platter with a few fresh herbs like parsley or chives, or a small bowl of the extra glaze for dipping.
Storing Your Chicken Minis
Got leftovers? Lucky you! Here’s how to store and reheat your homemade chicken minis to keep them tasting great:
- Storage: Let the assembled chicken minis cool completely to room temperature. Store them in an airtight container in the refrigerator for up to 3-4 days. If you cooked the chicken and biscuits separately and haven’t assembled them, store them separately in airtight containers. This is often the best way to maintain texture. Cooked chicken can be refrigerated for 3-4 days, and biscuits for 1-2 days.
- Freezing: Cooked chicken pieces (especially if homemade) freeze well. Let them cool, then place on a baking sheet and freeze until solid. Transfer to a freezer-safe bag or container for up to 2-3 months. Cooked biscuits can also be frozen (cooled first, then bagged), though their texture might change slightly upon thawing and reheating. Assemble after thawing and reheating.
- Reheating: Reheating is key to enjoying leftovers.
- For Best Texture (Oven or Air Fryer): This is my preferred method to regain some crispness. Place the minis (or separate components) on a baking sheet or in the air fryer basket. Reheat at 350°F (175°C) for 5-10 minutes, or until heated through and the chicken is crispy again.
- Microwave (Quickest): While the quickest, this will make the chicken and biscuits softer, not crispy. Heat for 30-60 seconds per mini, or until warm.
- Food Safety Note: Always ensure leftovers are heated through to an internal temperature of 165°F (74°C). Discard any food showing signs of spoilage (off smell, texture, or mold).
Recipe Remix Ideas for Leftovers
- Chicken & Biscuit Skewers: If you have extra chicken pieces and smaller biscuit scraps, thread them onto skewers with cherry tomatoes and serve with a dipping sauce.
- Mini Chicken Salad Sliders: Chop up leftover chicken minis (or just the chicken) and mix with mayonnaise, celery, and seasonings for a quick chicken salad filling for larger biscuits or slider buns.
Nutrition Breakdown
Here is an estimated nutritional breakdown per serving (assuming 6 servings per recipe):
- Calories: ~450-600
- Protein: ~25-35g
- Fat: ~25-40g
- Saturated Fat: ~8-15g
- Carbohydrates: ~30-40g
- Sugar: ~5-10g
- Sodium: ~500-800mg
Disclaimer: Nutrition data is an estimate calculated using online tools and may vary based on specific ingredients used (e.g., type of biscuit, chicken cut, amount of oil absorbed if frying) and preparation methods. It should be considered a general guideline.
Chicken Minis Recipe FAQ

Curious about something? Here are answers to a few common questions about making chicken minis:
- Can I use store-bought chicken tenders instead of popcorn chicken? Absolutely! Just cut them into bite-sized pieces that will fit nicely inside the biscuits.
- What kind of biscuits work best? Refrigerated “mini” layered biscuits are ideal for size and texture, but regular-sized ones cut into quarters work well too. Frozen dough biscuits or small homemade ones are also great options.
- Can I make the chicken ahead of time? Yes! Cook the chicken pieces fully, let them cool, and store them in the fridge. Reheat in the oven or air fryer just before assembling to ensure they are crispy.
- Can I bake the chicken instead of frying? Yes, definitely! This is a great healthier option. Follow the baking instructions in Step 4.
- How do I prevent the biscuits from getting hard? Be careful not to overbake them. They should be just golden brown. Ensure your oven temperature is accurate.
- Is there a savory glaze option? Yes, you could skip the honey and make a simple garlic butter or herb butter to brush over the biscuits and chicken instead.
Enjoy Your Creation & Let’s Connect!
There you have it! Your very own batch of warm, crispy, sweet, and savory homemade chicken minis. I hope you feel a real sense of accomplishment biting into these little delights, knowing you made them yourself. Whether you’re sharing them with family for a special breakfast, bringing them to a brunch potluck, or just treating yourself to a comforting snack, I know they’ll bring a smile.
If you give this chicken minis recipe a try, I would absolutely love to hear how they turned out! Leave a comment below and let me know your favorite part or if you added any fun twists. And please, share a picture of your delicious creations on social media! Tag @palate_recipes on Instagram or save it to your boards on Pinterest so I can see your culinary masterpiece!
What’s your favorite way to enjoy chicken minis – breakfast, snack, or something else? And what other drive-thru favorites would you love to see a simple homemade version of?